
What our customers are saying
Thoughts about our service
What was purchased
READ ANOTHER TESTIMONIAL
See what people are saying about Rattlesnake! Over 2300 testimonials and growing!
I have wanted to write this article for some time. We often get asked, "what is the best way to measure custom patch cables on the pedalboard or pedal line?" We must be both on the same page in regards to measurement points! This article will go into measurement techniques and details about patch cables and plug options.
Before we start talking about measuring, let's ask the age-old question, "Do patch cables matter?" I've personally used the cheapest cables on the planet (before I knew better), from medium-grade patch cables to finally - high-grade patch cables. The answer is obviously "yes," but why?
Since I've had experience with all the grades of patch cables, what matters? It's durability. The worst feeling while on stage is having a patch cable fail on your board. You next struggle to diagnose the bad connection on the pedalboard while everyone is waiting (the audience and your bandmates). When we vary in quality and price, it is almost due to two points – copper and plugs.
The cheapest patch cables out there have tiny gauge conductors and limited shielding. By going less on the copper, you save manufacturing and material costs. That thin copper conductor can break, and you have yourself a dead patch cable. The plugs are the next issue. The cheap cables don't use traditional plugs but molded housing that holds a 1/4" plug tip. This is a weak part of the cable and can be a potential failure point.
When you start paying for higher quality cables, you are paying for thicker gauge conductors (20AWG, for example) and quality plugs and soldered connections.
So patch cables do matter. You get what you pay for. Rule #1.
That's a hot topic. Though you can get them with good wire and the plugs themselves are strong, the weak point is "you ."The solderless patch cable usually comes as "kits" and requires the consumer to ensure the shield and tip contacts maintain a solid connection.
There is another issue with solderless patches – gasless connection. You might have come across this term in the past. With a solderless connection, you are strictly dealing with friction/tension to maintain that connection. Since this is not a gasless connection, that joint could develop corrosion, impurities (dirt, dried beer, etc.), and that connection can lose the best contact and degrade over time. You are fusing the wire to the plug with a soldered connection, forming a gasless/airtight connection.
Finally, vibration is something to deal with. I've personally seen screw plugs, set screws, etc., that connect the wire to the plug begin to loosen over time – especially for those road warriors out there on tour months out of the year. Some of you may say I've traveled for years without vibration as an issue – then you tightened those plugs perfectly, or your shocks on the band van are in pristine shape. Granted, not everyone knows how to solder, and I completely understand the appeal of a solderless cable kit.
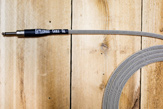
Here at Rattlesnake Cable Company, we have some common lengths for patch cables available. Our Flex Patches come in 6", 8", and 10", which will cover most of your basic needs in connecting pedals. Musicians with more complex boards and routing requirements, can submit a Custom Cable Request, but how do you measure for those cables?
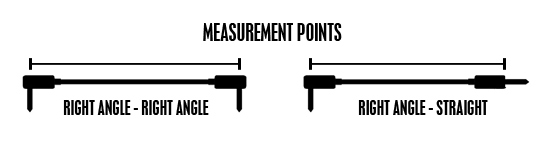
For all of us to be on the same page regarding measurement points, we have to define the rules. We measure from post-base to post-base - not the distance of exposed cable or from tip to tip. This is critical since different plugs have bushings, barrels, etc., affecting those gaps. Also, measuring from post-base to post-base makes it effortless and accurate using a piece of string.
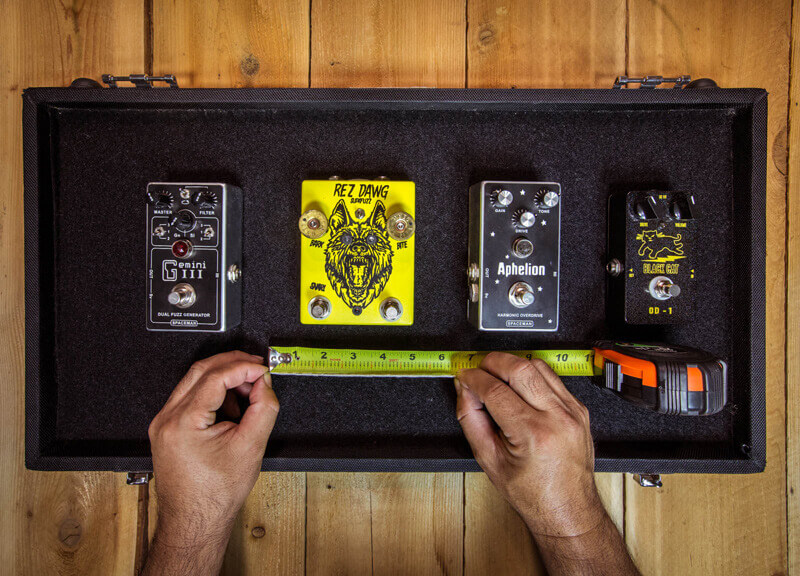
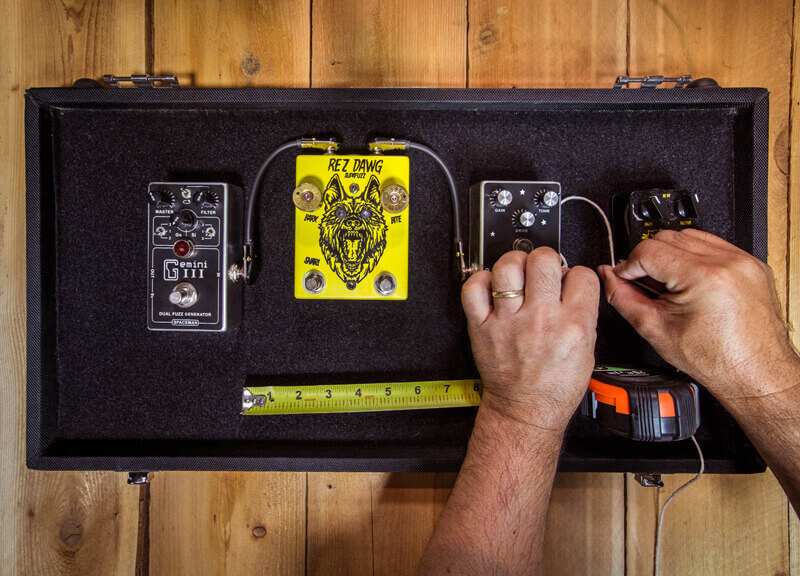
Below is a breakdown of how I measured a group of four pedals - some with side jacks and some with top-mounted jacks.
Step 1 – First, lay out the pedals on the board in the basic position. Take the time and stand up and test the placement with your feet; make adjustments if needed. Velcro'd pedals are good at this point. You will need a ruler or tape measure and a length of string or twine.

Step 2 – Use a piece of string, and with your thumb and forefinger, press the string on the jack and string it as if it was a cable to the other jack. The string should touch both jacks and have some slack to account for some wiggle room. Please do not make a straight line; it should curve and bend like a cable.
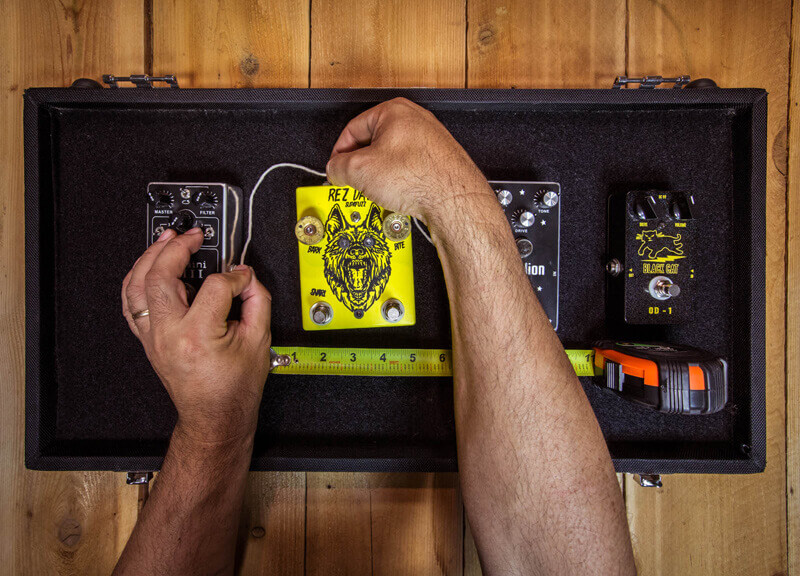
Step 3 – Now that you have both points pinched on the string, take the tape measure and note the length. That is the post-base to post-base.
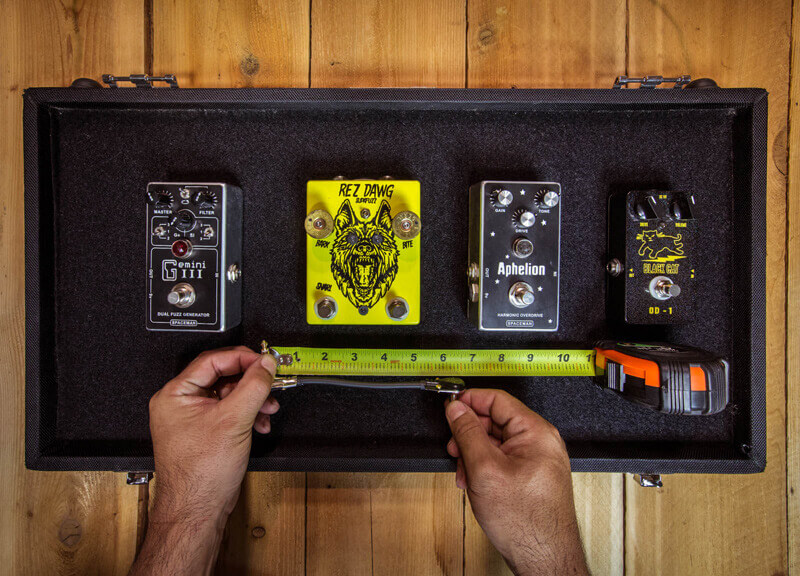
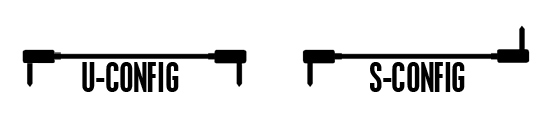
Step 4 – Now that the cable is made, please note that we went from the side jack of the Spaceman Gemini III Fuzz to the top mount jack of the Miner Glitch Electronics Rez Dog. Since we're going from side jack to top mount, we want an S-Config plug configuration. I discuss that further below in the article.
Step 5 – Next, we want to repeat this process going from the top mount jack of the Rez Dog to the side mount jack of the Spaceman Aphelion.
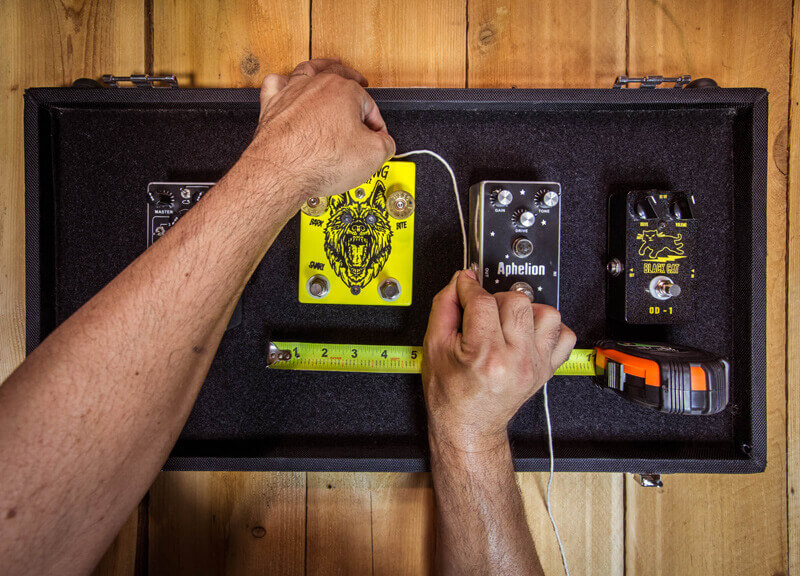
Step 6 – Repeat the process of marking the pinch points of the string on the tape measure. Again, this will be another S-Config.
Step 7 – Next, we are approaching the side jack of the Aphelion to the Black Cat. These jacks will be close, so this will be a U-Config.
Step 8 – Repeat the process of marking the pinch points of the string on the tape measure.
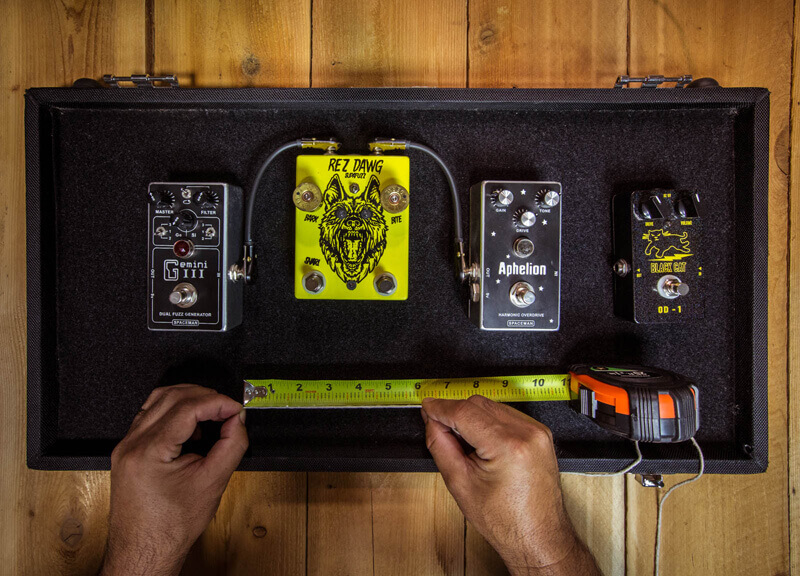
Step 9 - This cable will be a U-Config where the plugs face the same direction.

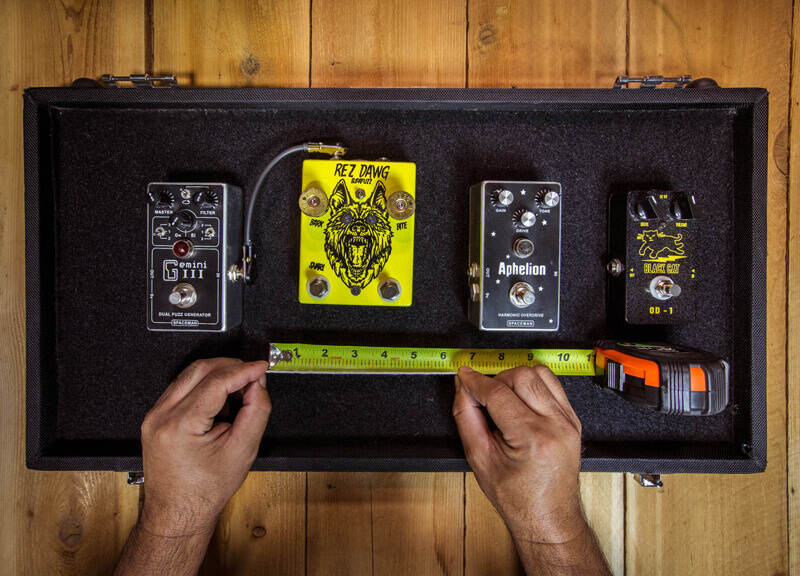
Finally, we have all the pedals wired with a mix of side and top-mounted jacks.
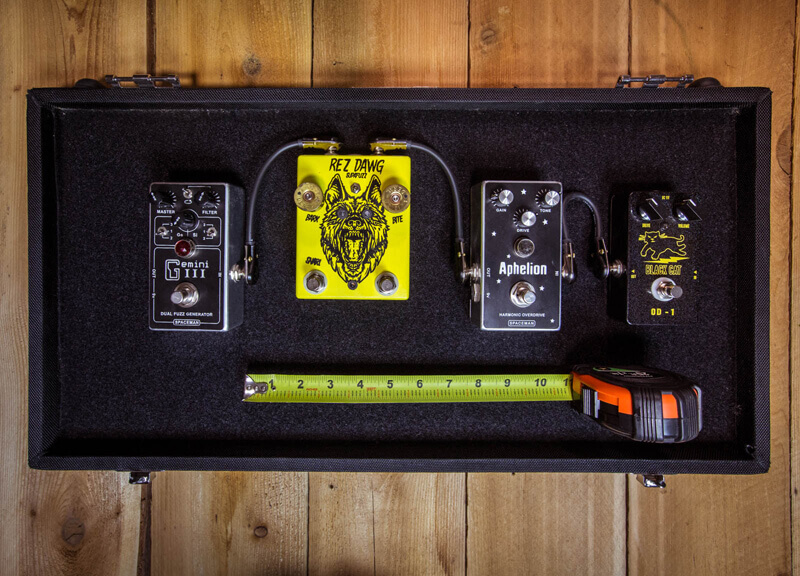
Depending on what plugs you use, you may need to add a little more "wiggle room" to compensate for bending around pedals and going below rails or slots of the boards.
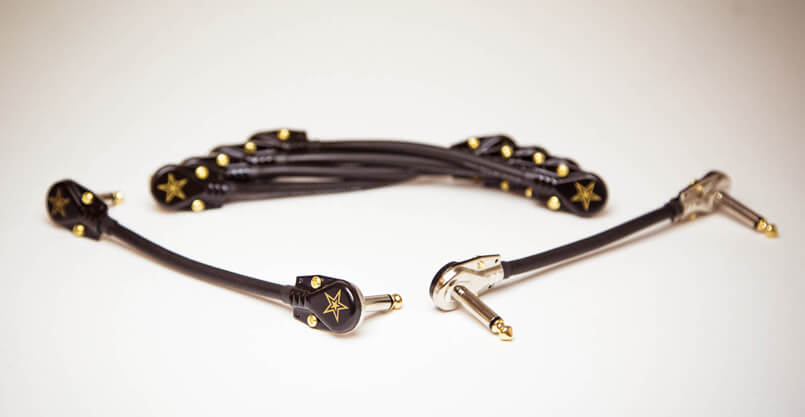
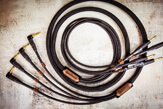
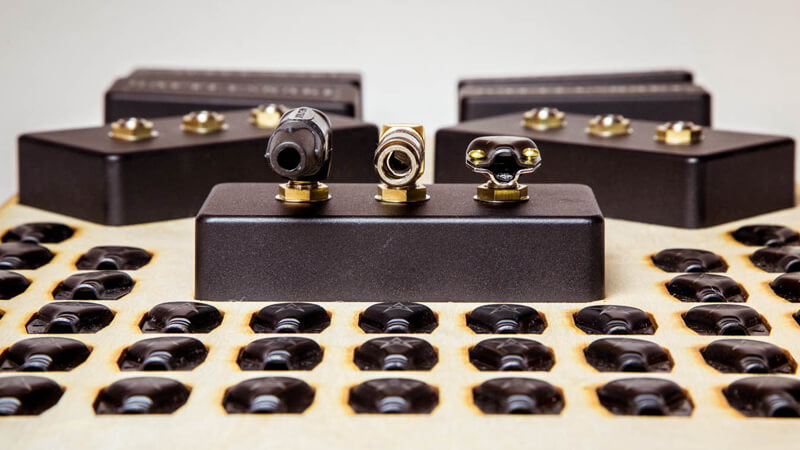
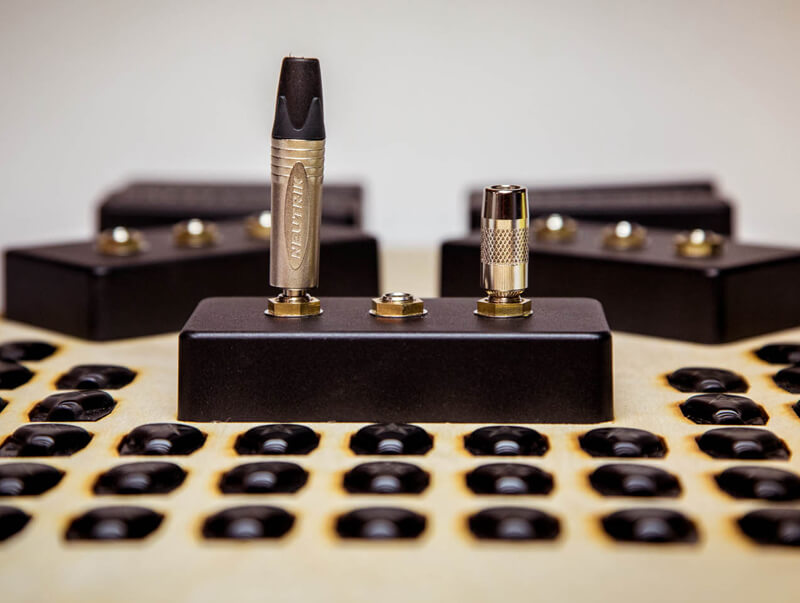
When dealing with a patch cable, we offer various plug options. They are all robust, and the primary concern is about the shape and footprint of the plugs themselves. Some plugs are wide in profile but short in height, which is ideal for close pedals. Some plugs are tall but narrow in width; these are ideal when jacks are very close together. Here is a breakdown of plugs we offer for pedalboards.
Rattlesnake Pancake – The Rattlesnake Pancake is a classic pancake style with a dual lug system for strong contact solder points for tip and shield. The width of the pancake is 0.81". Height from the post base is 0.48". Pancakes are ideal with plugs are side by side.
G&H Right Angle – The G&H Right Angle is a very durable and robust right angle. If durability is the most important factor, these are ideal. The width of the G&H Right Angle head is 0.50". Height from the post base is 0.65". G&H Right Angles are ideal for durability and if jacks are close together (like stereo jack pairs)
G&H Stubby Straight – The G&H Stubby Straight is a great straight plug option for tight places. Typically, straight plugs have a long barrel and bushing; this addresses that. The G&H Stubby Straight barrel is 1.05", where a Neutrik NP2X Straight barrel/bushing is 2.40". When measuring, it's important to consider that the barrels do not bend, so an inch of the measurement is not adjustable. The G&H Stubby is ideal for switching systems / true bypass loop strips with many jacks close together.
Neutrik Right Angle – The NP2X Series Neutrik Right Angle is a very high quality and durable plug that is used on our instrument cables. Depending on the situation, it could be used on a board. Neutrik's Right Angle width is 0.61". Height from the post base is 0.82". Neutrik Right Angles are great if you're planning on connecting boards or if you need a robust plug connecting pedals on the outside of the board like a Wah pedal, etc.
Neutrik Straight - The NP2X Series Neutrik Straight Plug (like the Neutrik Right Angle) is a high-quality plug primarily used for instrument cables but can be used for certain pedalboard applications - primarily as a "jumper" cable to connect pedalboards.
Here are some photos showing the comparison between plugs. Looking at right angle options – we have to go from left to right – Neutrik Right Angle, G&H Right Angle, and Rattlesnake Pancake
Top down view:

Side view:
Here is a photo showing a comparison between the Neutrik Straight (on the left) and a G&H Stubby Straight (on the right)
When configuring patch cables, you have the option to mix your plugs on a single cable. This is often the case with switchers like the Boss ES8, for example. In that case, a G&H Stubby Straight from the ES8 to a Pancake or G&H Right Angle for a pedal would be a typical configuration.
When we talk about plug orientation, we reference when both plugs are the right angle. We have two basic orientations: U-Config and S-Config. U-Config is where both plugs face the same direction forming a U shape with the plugs and the cable. This is particularly good for pedals that have side-facing jacks. This allows the cable to bend naturally in an arch and not stress the cable's internal structure.
S-Config is where both plugs face opposite directions forming a S shape with the plugs and cable. S-Config is perfect when connecting a side jack pedal to a top mount jack on the other pedal. You can make this happen with a U-Config, but it would require you to twist that cable to make that connection. Twisting in this sense can add undesirable strain to the internal structure of the cable.
There are many factors to consider when planning your pedalboard. Take the time to measure your cables carefully. Pick the correct plugs for the situation. But most importantly, allow yourself some wiggle room. You often need to make micro-adjustments on the board that isn't apparent during the build phase and become obvious while playing live. A little slack is very nice in that case. Also, when cutting, remember, if the cable is a little too long, that's much better than a little too short.
If you have a pedalboard rewire in the future, be sure to contact us for some custom patch cables using our Custom Build Form


Matt in Vineland NJ just made a purchase!
about 2 hours ago
Joe in New Orleans LA just made a purchase!
about 3 hours ago
KEVIN in jackson GA just made a purchase!
about 27 minutes ago
Andy in Georgetown TX just submitted a custom loom request!
about 1 hour ago
Ethan in Saint Augustine FL just made a purchase!
about 5 hours ago
Jeremy in Fresno CA just made a purchase!
about 4 hours ago
David in Hilton Head Island SC just made a purchase!
about 4 hours ago
Ryan in Pittsburgh PA just made a purchase!
about 2 hours ago
Benjamin in Des Moines IA just made a purchase!
about 4 hours ago
Kyle in Gallatin TN just made a purchase!
about 4 hours ago